 |
| source unknown |


Sunday, March 31, 2013
Easter Truth
He turned a cross, meant for pain and suffering, into a symbol of hope, everlasting and unconditional love, and eternal salvation.
Happy Easter, to you and yours!

Wear What You Eat

Wear these fun Plum Glitter Stud Earrings from SMAFactory and eat this healthy No-Bake Greek Yogurt & Berry Cheesecake from Bare Root.
Can I just say that I am dying to make this yogurt cheesecake? I always love healthy alternatives and this one looks so good! I am curious and craving! If any of you beat me to the punch, let me know how it taste. :)
Thursday, March 28, 2013
The Sweetest Chicks
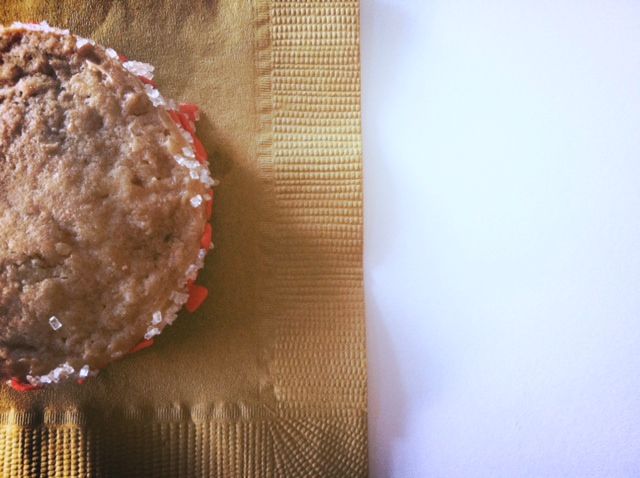
In the spirit of Easter, I decorated some sugar cookies! I say that with excitement because I love Easter for reasons pertaining to my faith...and the adorable symbolic spring animals, too. :)

I didn't have an egg shaped cookie cutter, so I took one of my inexpensive small circles and shaped it on my own. Easy!

I decided to decorate half of my sugar cookie eggs into Easter eggs popping with chevron stripes and polka dots. The remaining half turned into sweet little baby chicks. After flooding them with yellow and allowing them to dry, I added eyes, beaks, feet, and gilded feathers (using gold sprinkles). My precision with decorated sugar cookies isn't the greatest, but I am still loving how these guys turned out.
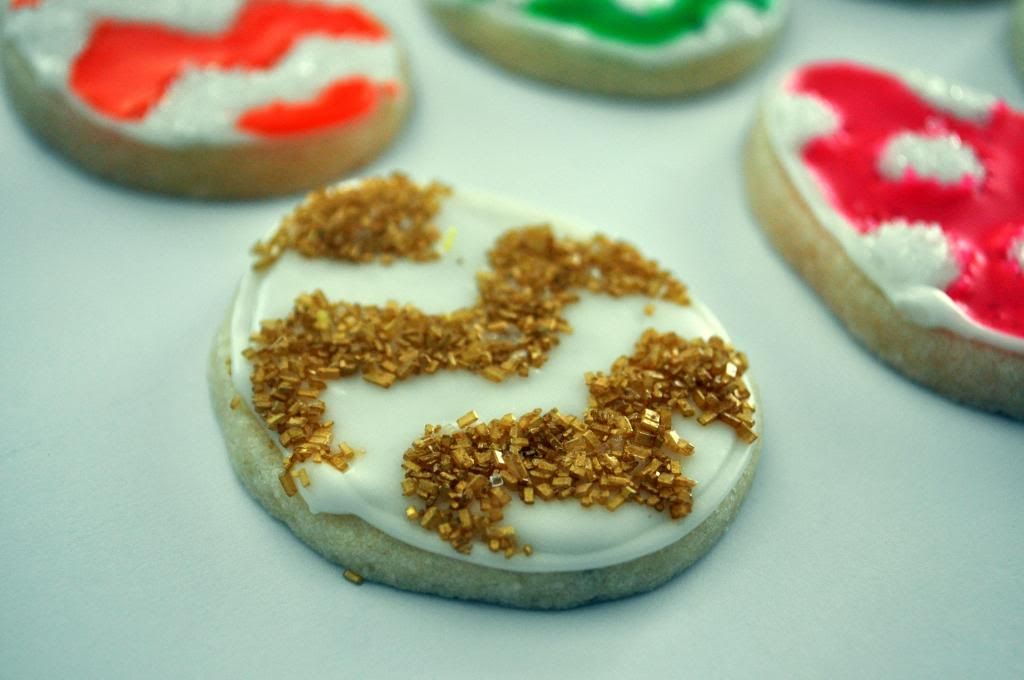
To adhere sprinkles to parts of the cookies, I just made sure all other parts of the cookie were dry and painted on a little royal icing onto the desired spot before shaking sugar sprinkles over it. This is just like adding glitter to the glue borders on handmade Valentine's in school!
For the sugar cookies, I used this recipe here by Sweetopia. For the royal icing, I followed this by Alton Brown.
Wednesday, March 27, 2013
Alien Juice
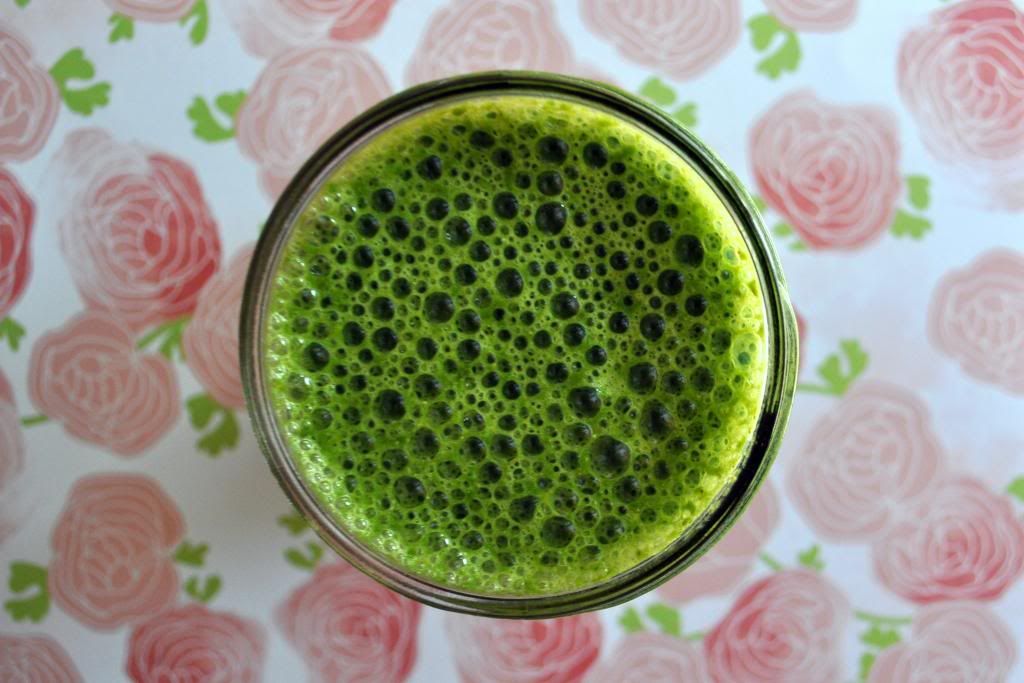
I know there are a ton of fantastic green smoothie recipes out there. Frankly, because they are so good for you and very simple to make, I am not surprised. Some of you may already be green smoothie fans and some of you may be weary of drinking anything that resembles the innards of a slimy green alien (appetizing, huh?). Regardless of your stance on the matter, I urge you to try this completely natural and dairy free spinach smoothie out!
I have been blending this recipe up and enjoying it with my oatmeal and egg whites breakfast, for a few mornings in a row lately. It's very filling and refreshing. It even has great flavor-- the husband even loves it.

After finishing off my own glass of this spinach smoothie this morning, I looked at Henry and thought about our future children. I told him that this was so easy to drink and a marvelous way of getting extra greens into our diet-- add a little more sweetness with fruit and I bet the kiddies would drink it. They may be more inclined to drink it if I called it "Alien Juice". Some kids are silly and dorky enough to love that kind of stuff. Knowing how the both of us are, I am kind of expecting to have those kinds of offspring.
Cheers to clean eating!

Spinach Smoothie (with Chia Seeds & Ginger)
makes 1 serving
1 large handful of fresh baby spinach
1/4 cup natural & unsweetened applesauce
1 tbsp chia seeds
1 lime
1 1/2 tsp freshly grated ginger
1 1/2 cup unsweetened almond milk
Splenda *optional
1. Add all the ingredients, except the splenda, into a blender. Use the liquify setting and blend for about one minute. For more sweetness, add desired amount of Splenda to taste. If you'd rather use honey or agave, that would be fine, too.
2. Serve immediately.
*Note: You can chill any leftovers, but the texture of the smoothie will become lumpy after awhile. The chia seeds will soak up moisture and create a curdled layer...I recommend drinking right away or leaving the chia seeds out.
Tuesday, March 26, 2013
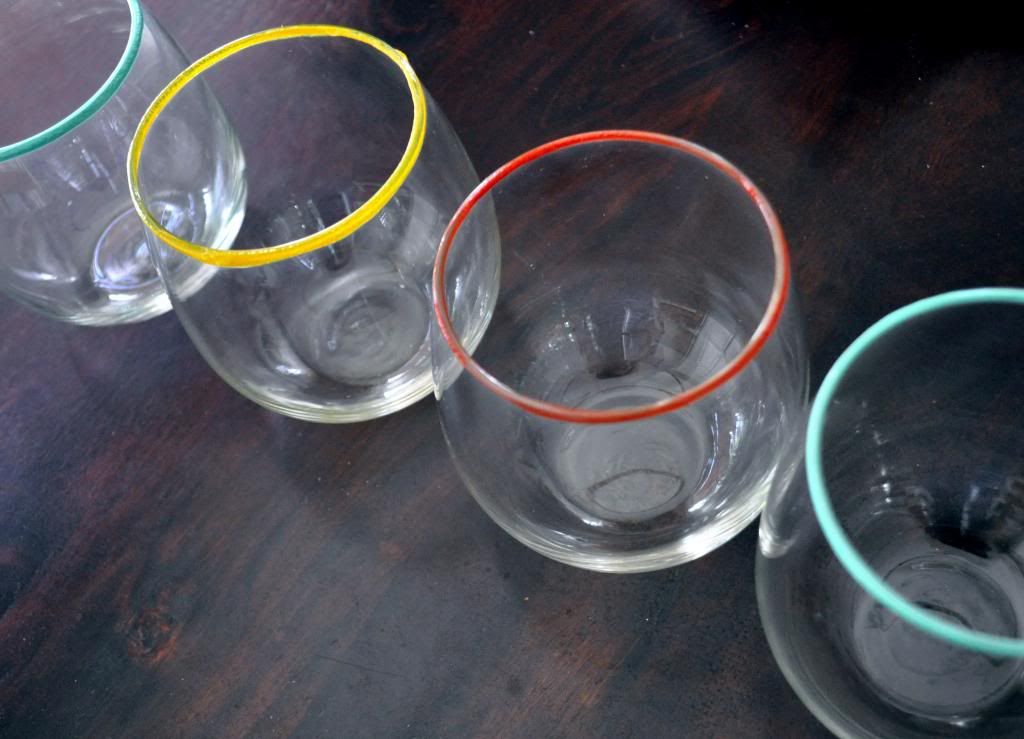
DIY: Color Pop Glasses
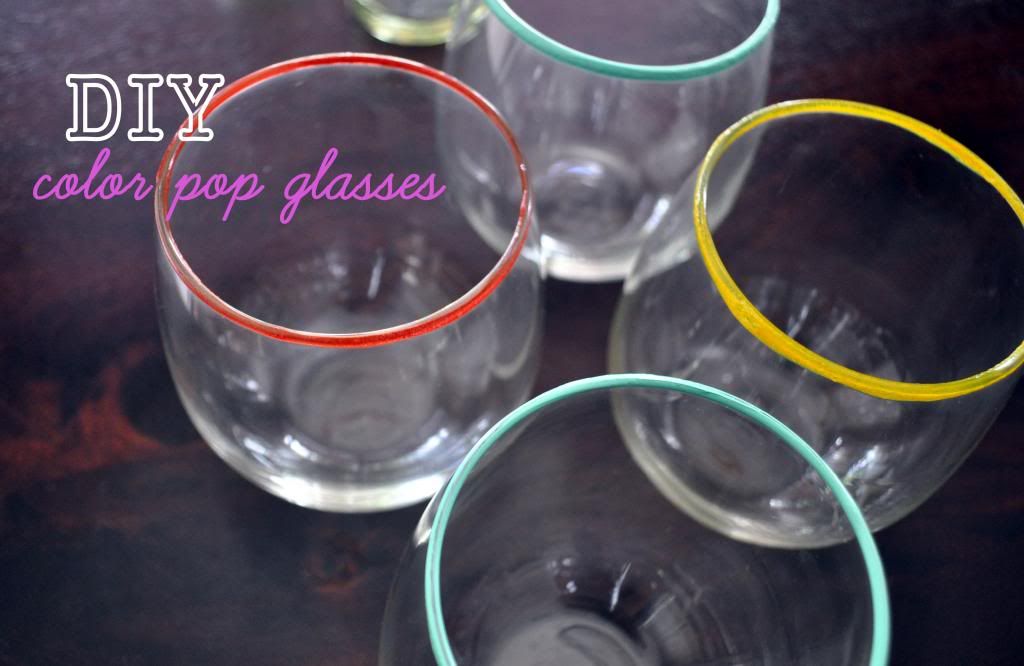
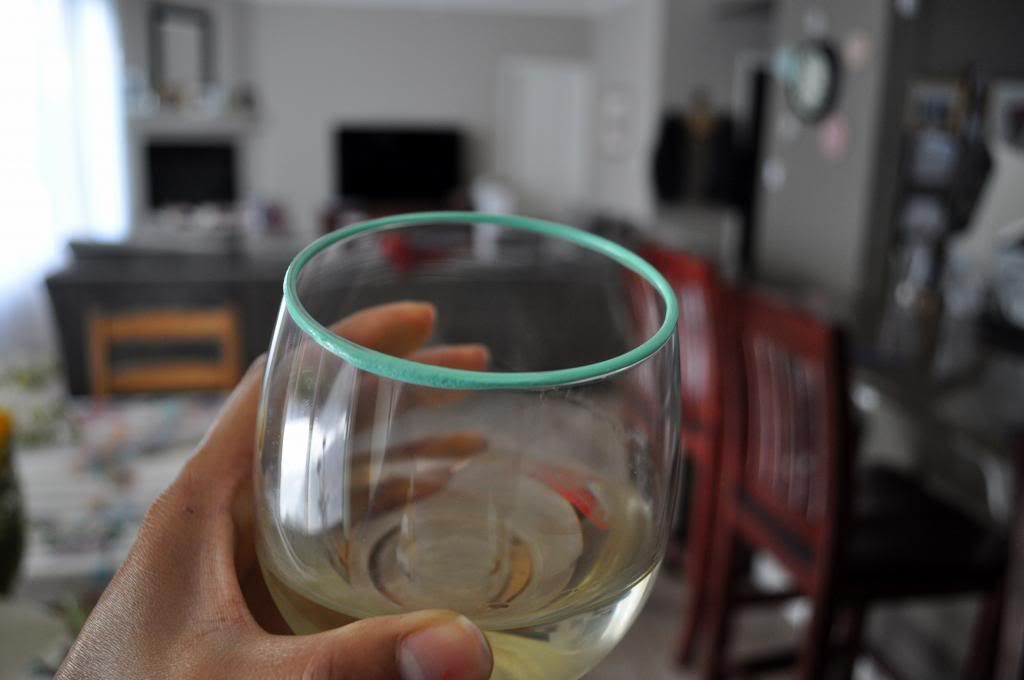
Last month I was doing a little shopping at Anthropologie and spotted these adorable little juice glasses. The pleasant pop of color had me swooning over them as I imagined my milk, juice, and other beverages filling them up. However, it didn't take long for my inner craft diva to spark up an idea on how to recreate these charming glasses. They may not be as pristine as Anthrpologie's, but my DIY Color Pop Glasses certainly have me swooning just as much. Especially since making 4 of them cost less than buying a single one-- cha-ching!


DIY Color Pop Glasses
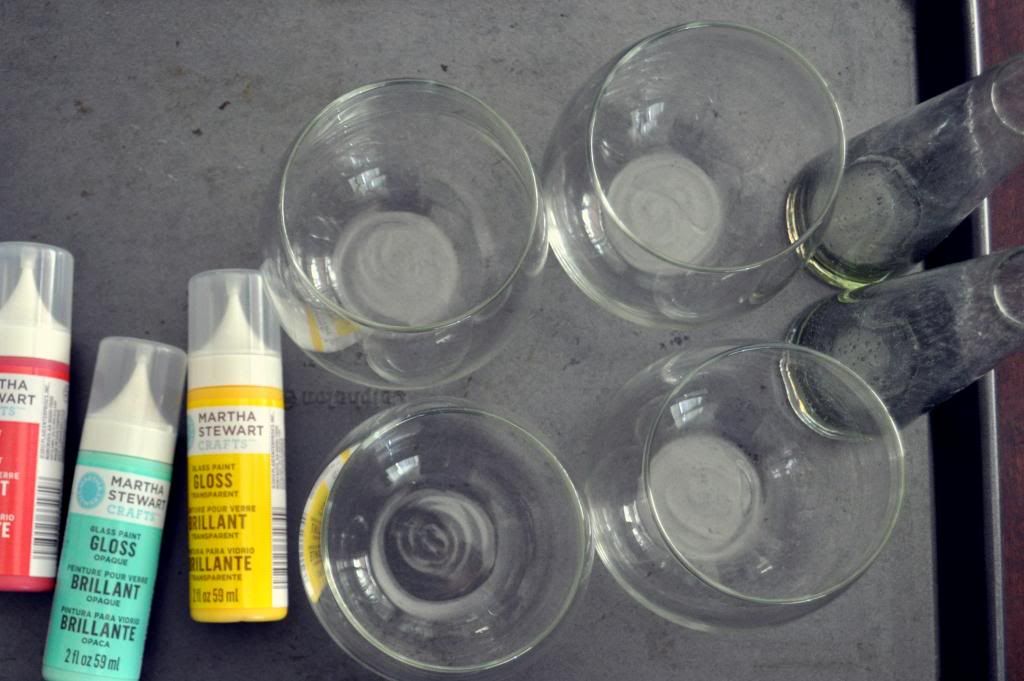
Materials:
Plain glasses (I bought a box of simple stemless wine glasses from TJ Maxx for $5.00. I also had a pair of little vases from some old reed diffuser sets.)
Rubbing Alchohol
Cotton balls/pads
Martha Stewart Glass Paint (colors of your choice in either opaque or transparent)
Small paint brushes
Small paper plates
Baking sheet
Oven
*Notes: The transparent glass paint is lovely, but I ended up loving the look of the opaque glass paint on my color pop glasses more. The more saturated color stands out more, in my opinion.
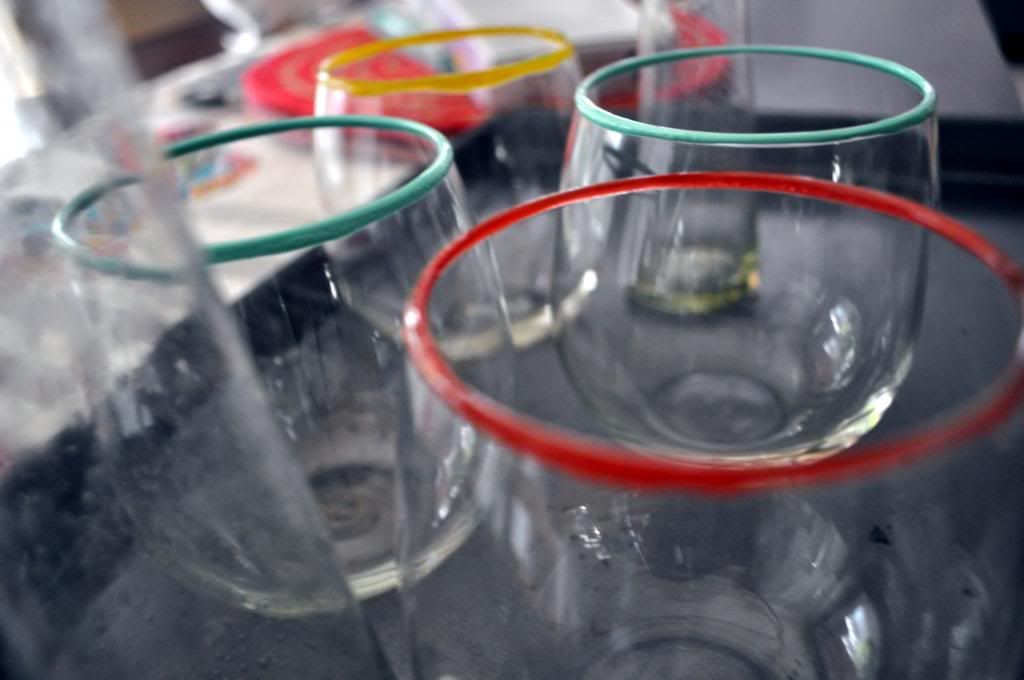
Directions:
1. Lightly soak a cotton ball/pad with rubbing alchohol and gently clean off the surface of each glass. I focused primarily on the areas I knew I would be coating in glass paint.
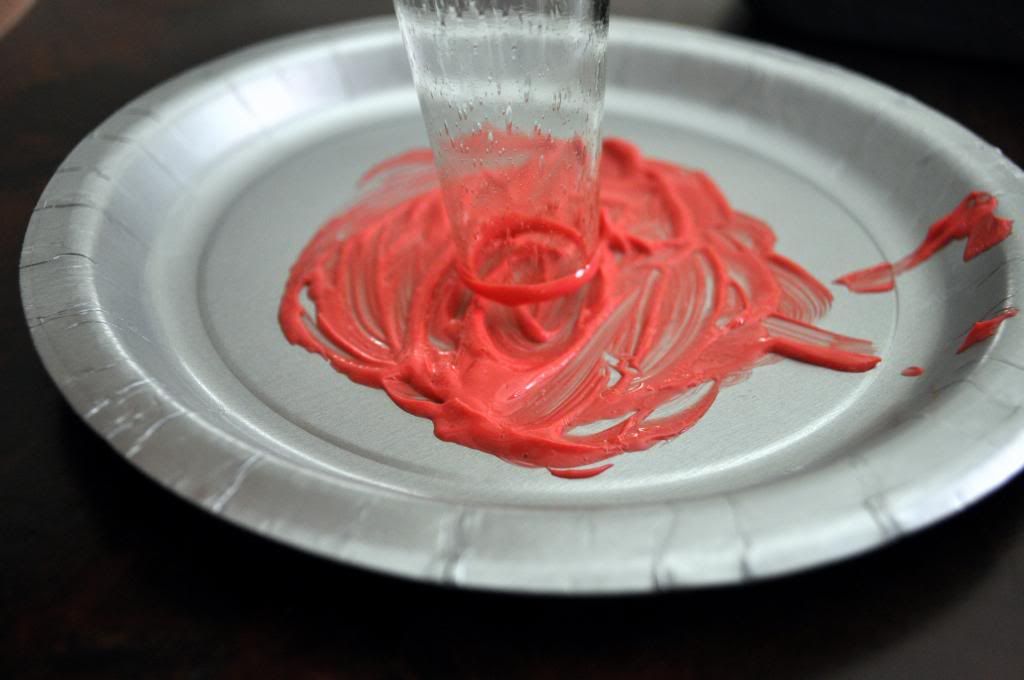
2. Squeeze about 1-2 quarter sized amounts of glass paint onto a paper plate (one color per plate). Use a clean paint brush to smooth the paint over the plate in attempts to create as even a layer of paint as possible.
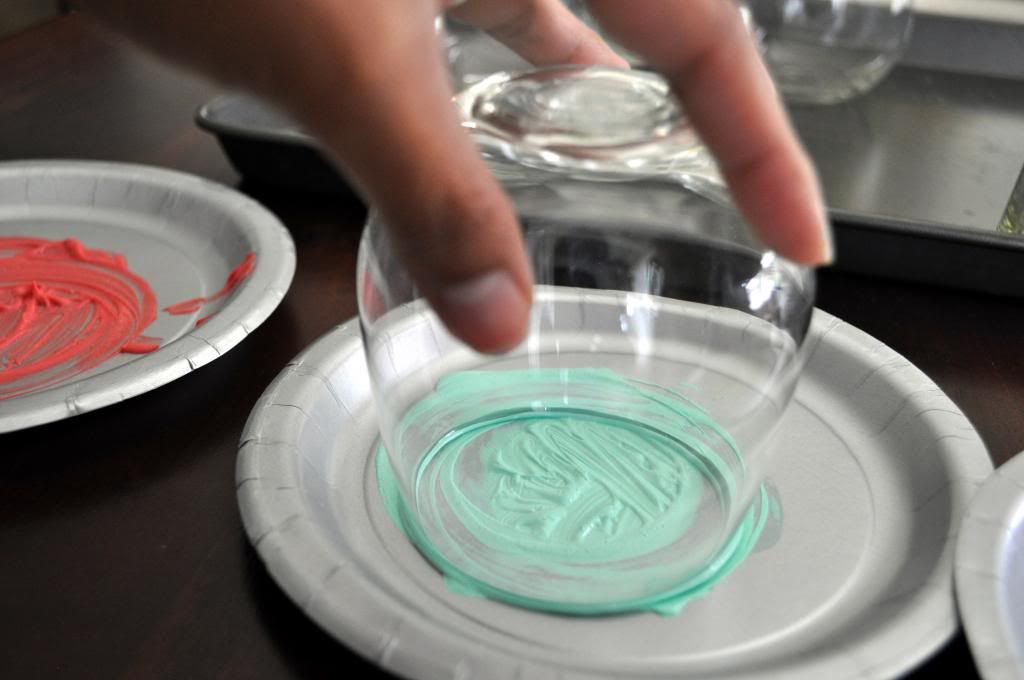
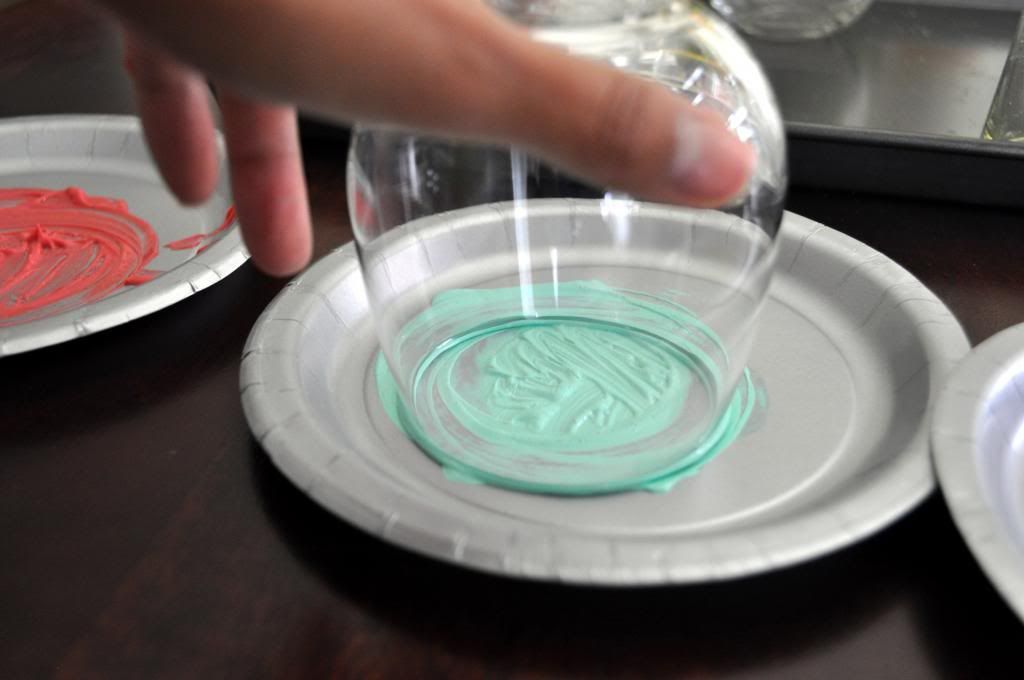
3. Take hold of a glass and lightly place it upside down onto a plate containing glass paint. Slowly and gently, grasp the body of the glass and turn it 360 degrees a few times. This is to ensure that the rim is coated evenly. When finished coating the rim, place the glass, upright, onto the baking sheet
4. Repeat this process with your remaining glasses.
5. Allow the glasses to dry on the baking sheet for at least one hour. After they are dry, place the entire sheet of glasses into a cool oven (do not preheat).
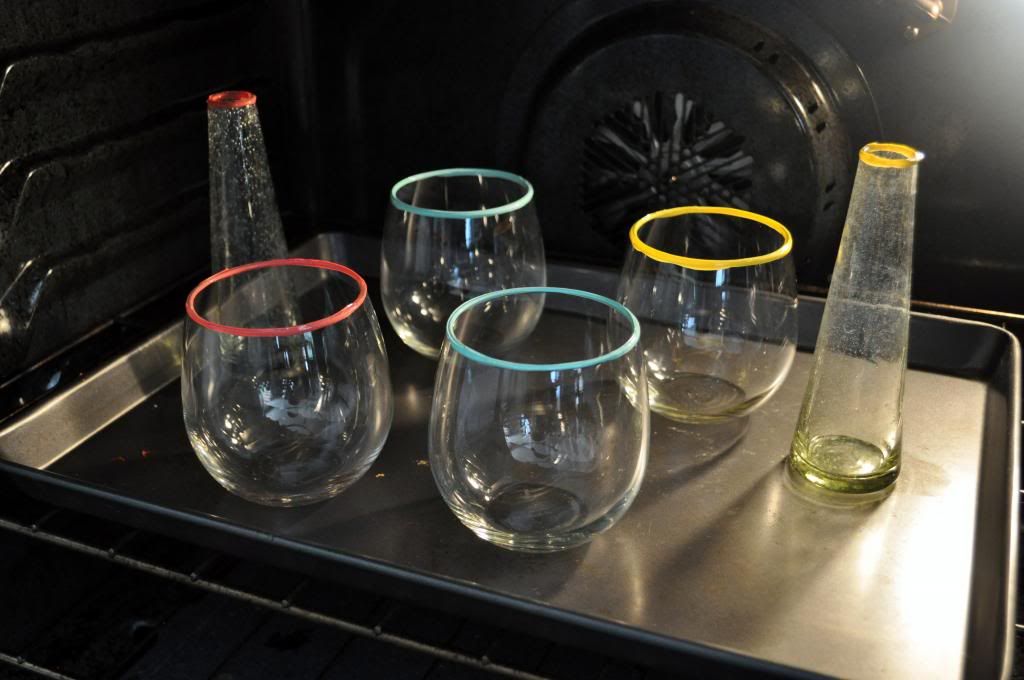
6. Close the oven and set the baking temperature to 350 degrees F (the glasses need to be baked with gradual heat). Once the oven has finished heating up to 350 degrees F., allow the glasses to bake for 30 more minutes. Turn off the oven and let the glasses cool in the oven completely-- after doing other tasks, I came back to these guys about 3 hours later.
7. Leave the finished color pop glasses out at room temperature for another 72 hours before washing and using. These should be dishwasher safe (as long as your glasses are).

Sunday, March 24, 2013
Wear What You Eat

Wear this stunning Vintage Satin Brocade Embellished Headband by Hanging by a Thread and eat this creamy and lucious Honey Panna Cotta from Loretta of A Finn in the Kitchen that has an uncanny resemblance to sunshine in a glass.
Saturday, March 23, 2013
Puppy Love
And they called it puppy love
Oh, I guess they'll never know
How a young heart really feels
And why I love her so

Someone help me, help me please
Is the answer up above?
How can I, how can I tell them?
This is not a puppy love

This is not a puppy love
This is not a puppy love
Thursday, March 21, 2013
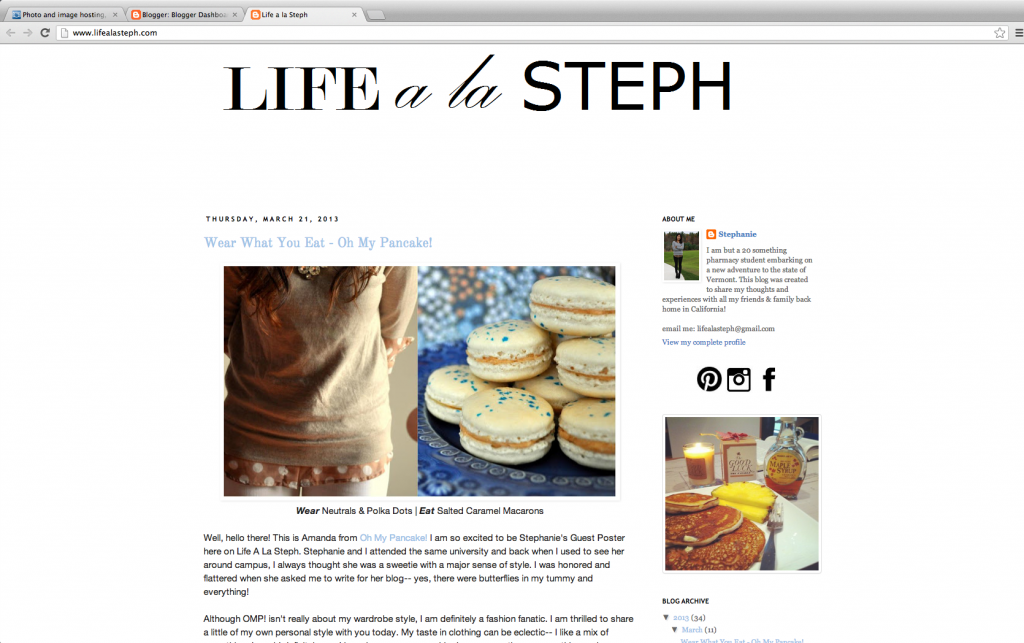
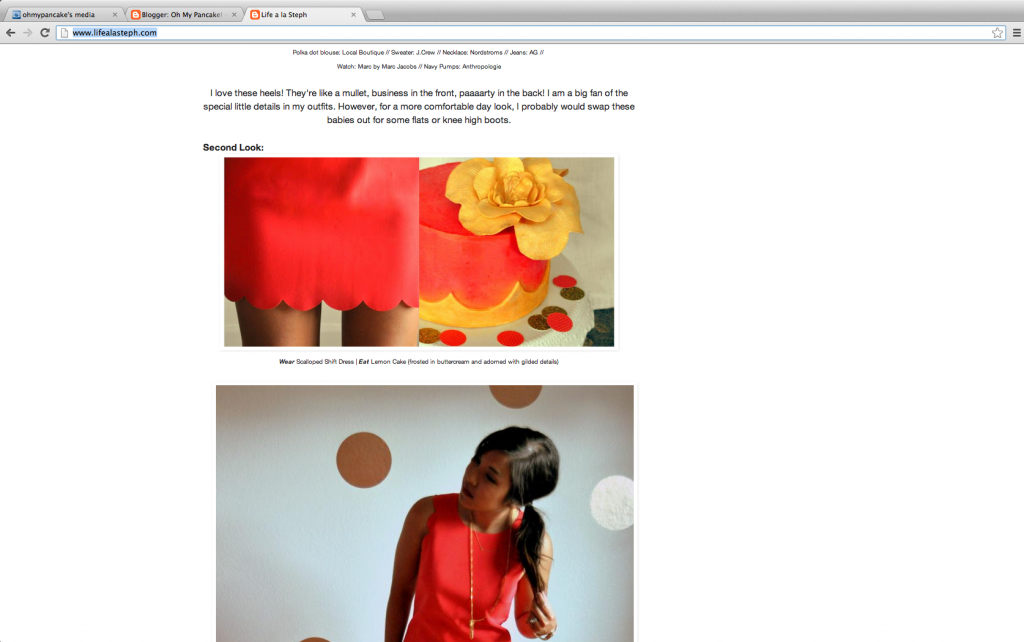
OMP! Featured on Life a la Steph!
I am so giddy to announce that I had the pleasure of writing a guest post for Life a la Steph-- the fashion blog home to a very stylish and sweet Stephanie. If you don't know of her blog yet, now is your chance!
You can check out my first outfit post on her blog(yes I dressed up for Steph!). And, yes. Of course sweets were involved. Let me know what you think! :)
Gluten Free Coconut Pancakes
I know what you're thinking. Gluten free Pancakes? They are low-fat, low in sugar, and might as well have "EAT ME, I'M HEALTHY" written all over their little pancake tushies. Delicious? Fluffy? You're husband liked them? Yes, yes, and yes (two breakfasts in a row).
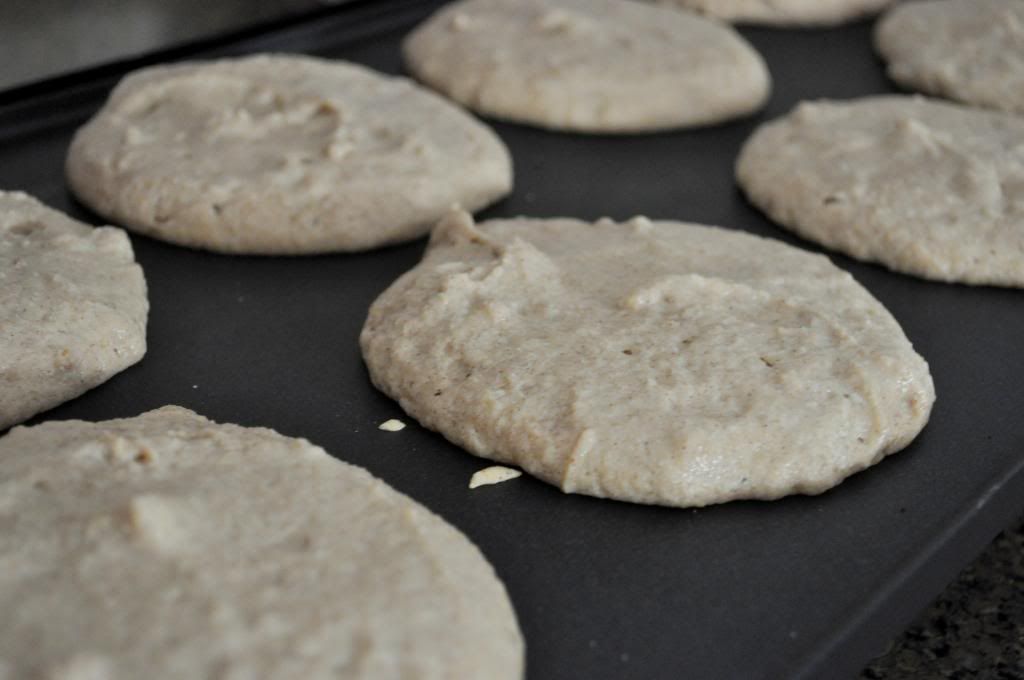
I've had to explore more gluten free options for everyday eating (as per doctor's suggestion). After several weeks of a pancake-less life, I came up with this recipe. These pancakes are full of coconut flavor with a little bit of cinnamon spice. They are sweet enough to enjoy without syrup, but of course the company of it would be welcomed sweetly.
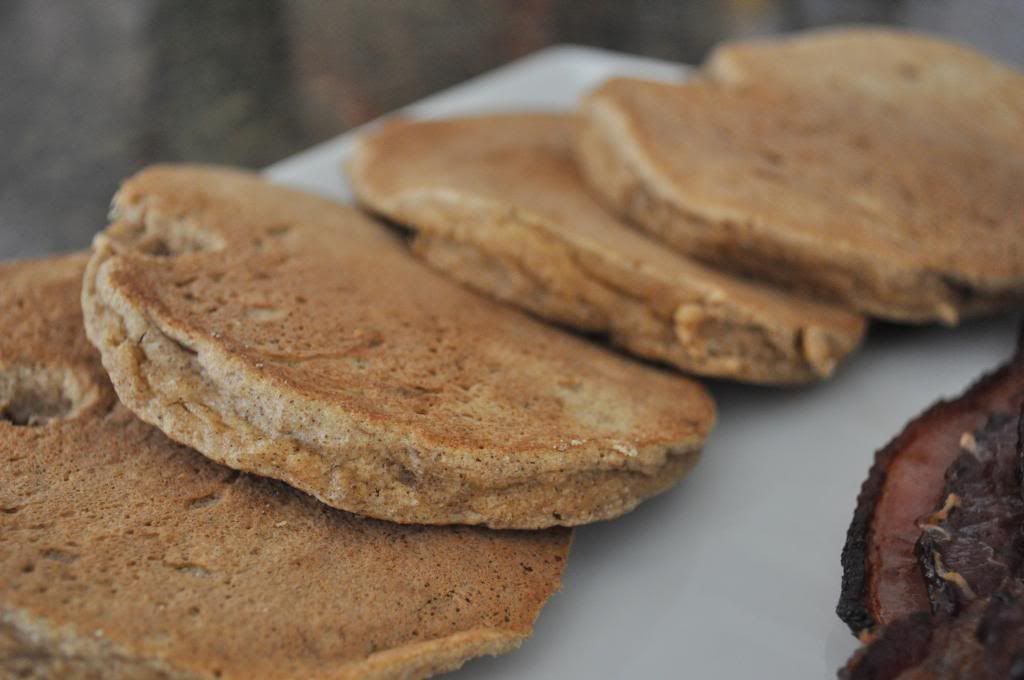
The secret to keeping these pancakes from being too dense and cake like is in the egg whites. Whenever I make pancakes, I prefer to whip the whites up separately until they form stiff peaks-- these guys are no for exception. The addition of air truly makes a difference!
Sorry for the lack of pictures. On both occasions these pancakes were amazing. However the first time I was too busy eating to care about pictures. The next time, I repeated the offense after two photos. Point is: in the event of belly vs. photos, belly wins.
Gluten Free Coconut Pancakes
makes about 10 5-6" pancakes
1 1/4 cup coconut flour
3/4 cup gluten free oat flour
1 tsp baking powder
1/2 tsp baking soda
3 tsp ground cinnamon
1/2 tsp ground nutmeg
1/2 tsp salt
1/3 cup brown baking Splenda
3 eggs (separate yolks from whites)
3 tbsp coconut oil (in liquid form)
2 cups unsweetened almond milk
1 1/2 tsp vanilla extract
1. In a medium bowl, use a hand mixer to beat the separated egg whites until stiff peaks have formed. Set aside.
2. In a large bowl, whisk together the coconut flour, oat flour, baking powder, baking soda, cinnamon, nutmeg, salt, and brown baking Splenda. Make a well in the middle of the dry ingredients and pour and then mix in the egg yolks and coconut oil. Pour in the almond milk and gently whisk together. *Note: Coconut flour will absorb the liquid very quickly. If your batter still looks a little dense, add a little bit more almond milk until the right pancake consistency is achieved. Use a rubber spatula to gently fold in the beaten egg whites until the have been well incorporated.
3. Ladle about a 1/4 cup amount (I used an ice cream scoop) of batter onto a griddle heated to about 325 degrees F. (or medium heat). If you are not using a non-stick pan/griddle, be sure to grease your surface. Cook each side of the pancakes for about 4 minutes, or until the edges are slightly crisp and lightly browned, before flipping. Cook an addition 4-5 minutes on the opposite side.
Wednesday, March 20, 2013
A Little Fact & Opinion...and a Whoopie Pie
Fact: Henry loves his sweet snacks.
Fact: Amanda packs his lunch while he gets ready in the morning. She also makes breakfast.
Fact: One morning Amanda tried to sneak a little surprise treat, with a love note, into Henry's lunch box.
Fact: Henry doesn't tend to check his lunch box at home-- only at work when it's time to get his grub on.
Fact: This day, however, he wanted to see what Amanda had packed him. Before Amanda could stop him, he began to open up the lunch box.
Opinion: The shrieking of, "NO!" mixed with some strange audible sound coming out of Amanda's mouth was deadly.
Fact: Amanda told him she hid a surprise in his lunch.
Fact: Amanda felt sad that her plan had unraveled.
Fact: Henry still ate his lunch and loved his surprise whoopie pie, adorned with little hearts and a cheesy note.
Fact: He called during his work break to tell her so-- it made her laugh and smile.
Fact: Romantic gestures don't always work out how you want them to.
Opinion: It's the thought behind these things that counts. Even the smallest acts of love keep the romance alive.
Opinion: It doesn't have to be Valentine's Day to show someone you love them.
Opinion: The last stated opinion should be a fact.
Tuesday, March 19, 2013
Creating Our Eclectic Office Space
Being a newlywed and a owning a home equates to many blessings. However, it also means I have a constant decorating itch. I find myself thinking of all the different ways I can make our home a more comfortable living space that Henry and I both enjoy. Everything takes time and money when it comes to creating the space of my dreams. Currently, I am working on redecorating two spaces upstairs-- including our spacious loft which we are turning into an office/work room.
Little by little, it is coming together. We finished painting the walls several weeks ago and I have been hunting for great furniture pieces on Craigslist and at thrift stores (I prefer refurnishing and updating vintage finds). Since this is a space that the hubby and I will both share, I am refraining from styling it with too many feminine touches. My vision for the workspace is for it to be eclectic and modern, with a little bit of vintage charm. Although Henry doesn't really mind what the end product looks like (besides hoping that I don't cover the room in floral prints), we both agree that a luminous, light, and creative feel, with a good dose of color, would be ideal.
I can't wait to share what the work in progress looks like in the next few weeks! I am so excited to get things set up and ready. In the meantime, here is a collection of finds I put together that does brings my inspiration and plans together and gives you an idea of the look I am going for.
 |
| oh my office! by amandaaaloves via Polyvore |
Louis Nui Print / Weathered Limoges Oak Chest / Horchow "Alexa" Dining Table / George Nelson and Associates Nelson Crisscross Ball Pendant Lamp / Worlds Away Lamar Gold Leaf Etagere / Color Plus Dark Plum White Pleated Shade Ovo Table Lamp -... / Tulips In Burlap Vase / Ikat Print Burlap Lumbar Throw Pillow / Galloway Glazed Jardiniere / Smythson Make It Happen Small Notebook / Gold Chevron Pillow / Orla Kiely Frill Check Hardbound Notebook / Linea Chartreuse striped ceramic vase, $38 / Serena & Lily Rolling Storage Crates
Monday, March 18, 2013
Recipe Repost: Low-Fat Sun Dried Tomato & Garlic Cream Pasta
Let's get one thing straight. I love pasta. It's an instant comfort food and easy weeknight meal. When smothered with the right sauce, it can be absolutely satisfying and divine.

Lately, though, I feel as if I had a bad break up with pasta. It's like the ex-carb of my love life. While writing this post, I realized that I haven't had any pasta for several months. Not even kidding, I think it's been since the spring of 2012. As I was watching my weight for my wedding, I reduced my simple carbohydrate consumption. Now, per doctor's orders, I am abstaining from eating wheat and gluten foods due to health reasons (related to my resignation from teaching).
To sum it up, I miss pasta. Sometimes I open up my pantry and look for the box of penne that once stood graciously in the back. I feel like I am looking for a ghost. The once-love-of-my-life. Sigh. Like all breakup's, I knew it was the right choice, it's just harder to move on than I expected. Oh, pasta. You'll never really know how much you I love you, still.
In honor of my ex-carb, I am reposting one of my favorite recipes I have made for an amazing pasta dish. The sauce for this dish is creamy and dreamy. Don't tell anyone that it's low-fat and they won't know the difference. Bon Appetit!
Sun-Dried Tomato & Garlic Cream Sauce
reposted from my old blog, "Yumology"
makes enough for approx. 1/3 lb of cooked pasta
3 tbsp unsalted butter
7 garlic cloves, minced
3 tbsp all-purpose flour
2 cups fat-free milk
1/2 cup chopped sun-dried tomatoes (I used a variation that was soaking in olive oil, but drained the oil)
3/4 cup freshly grated Parmesan cheese
1 1/4 tsp salt
1/4 tsp pepper
1. In a medium sauce pan, heat the
butter on medium heat. When melted, add the garlic and cook for about 1
minute. Add the flour and whisk into the butter and garlic until a
doughy texture is formed (this is your roux). Slowly pour and whisk in
the milk until mixture is combined. Cook on medium heat while whisking
continuously until sauce thickens (approx. 5-6 minutes). Add and stir in
the sun-dried tomatoes, cheese, salt, and pepper. Stir constantly and
cook for an additional 2 minutes. Turn off heat and add cooked pasta;
toss pasta to coat in the sauce.
Sunday, March 17, 2013
Wear What You Eat
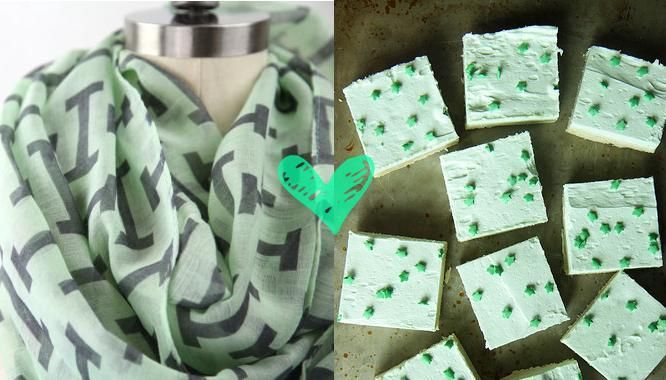
Wear this adorable printed Mint Infinity Extra Chunky Lightweight Scarf by Gertie Baxter and eat these precious Vanilla Cookie Bars by Heather Christo (I don't know anyone who can pass up a good sugar cookie...now in a bar?! No way!).
Friday, March 15, 2013
DIY: Easy Silk Flower Brooch
Today's DIY is all about the "F" Word.
Yes, you read me correctly. The "F" word.
Five. What word were you thinking, eh?
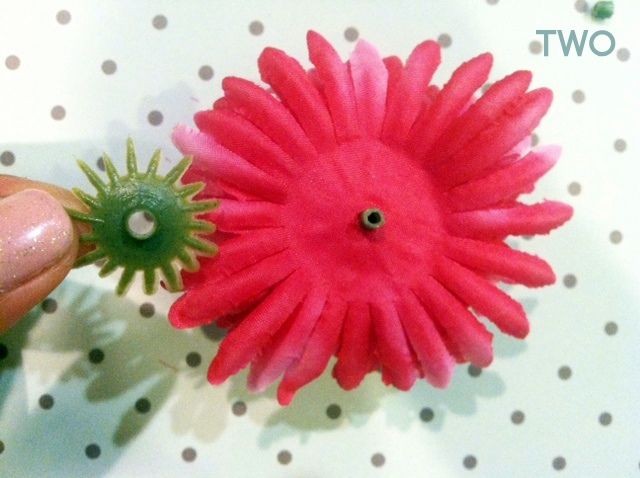
These easy silk flower brooch take about five minutes to make and there are five steps needed to follow. Call it the "lazy girl's guide to style" if you must, but it's very simple! I love bold statement accessories and 1wearing flower brooches definitely falls into that category. I started making these a few years ago after seeing some adorable flower accessories in a retail shop. They were being sold for about $15 a piece. I took studied the merchandise carefully, but it didn't take me long to realize I could make the darn thing. This DIY uses already made silk flowers from the craft store. There are silk flower pins I like to make using fabric, but that's another DIY on another day.
So. Let's get to it! You're five steps away from being a delightful representative of the spring season.


I hope this extremely easy DIY was helpful to some of you. I know there are other ways you make these. I've used wires and sewn thread through the flowers to secure the petals instead of using hot glue. However, they always end up looking the same and just as cute. My flowers don't endure a lot of hardship so there's really no need for me to worry about extra strong reinforcement. Like I said, call it the "lazy girl's guide to style" if you must! :) If any of you end up making these or already love pairing flowers with your outfits, I'd love to see some pictures!
P.S. Sorry about the awful lighting and image quality. I made these last night and my camera isn't too talented with better low-lighting images. On that note, we're hoping to get a nice SLR camera soon! Any recommendations for one?
Yes, you read me correctly. The "F" word.
Five. What word were you thinking, eh?
These easy silk flower brooch take about five minutes to make and there are five steps needed to follow. Call it the "lazy girl's guide to style" if you must, but it's very simple! I love bold statement accessories and 1wearing flower brooches definitely falls into that category. I started making these a few years ago after seeing some adorable flower accessories in a retail shop. They were being sold for about $15 a piece. I took studied the merchandise carefully, but it didn't take me long to realize I could make the darn thing. This DIY uses already made silk flowers from the craft store. There are silk flower pins I like to make using fabric, but that's another DIY on another day.
So. Let's get to it! You're five steps away from being a delightful representative of the spring season.
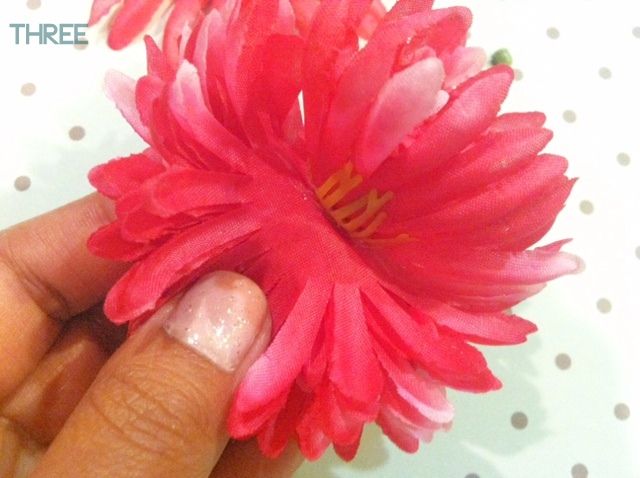
Step 1. Get it.This is an easy one. Get your materials. You will need: felt, silk flowers of your choice, pin backs, and alligator clips (optional). Scissors and a glue gun are not pictured, but you will also need these items.
Step 2. Snip it. Use your scissors to cut the stem off and get as close to the silk flower as possible (leave a little nub to keep the petal layers from falling off). You can then remove the green stem cap (I'm pretty sure that's not the official name for that guy).
Step 3. Glue it. Use your glue gun and add a little hot glue in between each layer of the petal. Don't forget the backside and deep inside the center on the front of the flower piece. If you have any annoying hot glue strings, be sure to remove them.
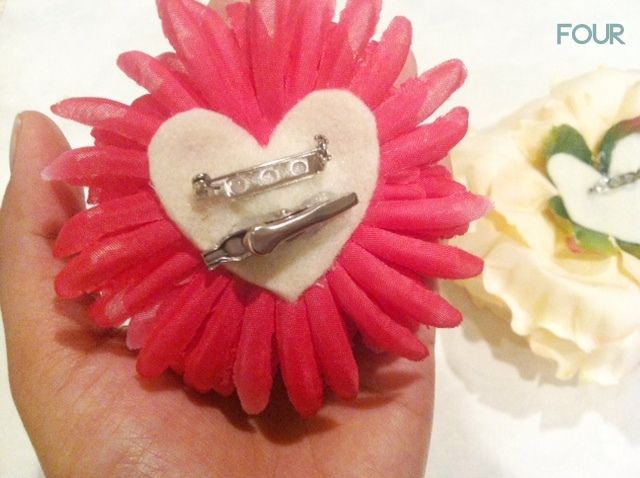
Step 4. We're still gluing. Take a piece of felt you have cut that fits the back of the flower (I made a heart, but you can just make a circle). Glue this onto the back of the flower-- make sure to secure it well. Then, glue your pin back and optional alligator clip onto the felt.
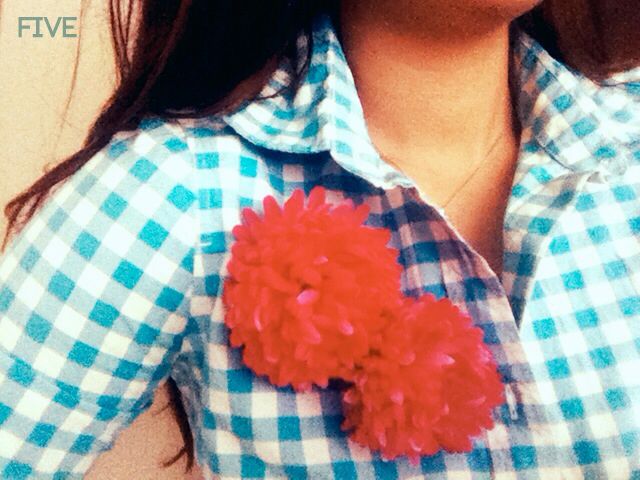
Step 5. Wear it. Repeat these steps with any other flowers you want to turn into brooches and add it to your outfit. I personally like to pair the flowers' texture and color to dresses or tops that won't seem to bulky with the added detail. I also look for color tones and see what works with the outfit.
The flower I am wearing with my black and ivory silk polka dot dress in my engagement photos (see here on Married with Pancakes) is one I made out of a fuchsia rose.
P.S. Sorry about the awful lighting and image quality. I made these last night and my camera isn't too talented with better low-lighting images. On that note, we're hoping to get a nice SLR camera soon! Any recommendations for one?
Thursday, March 14, 2013
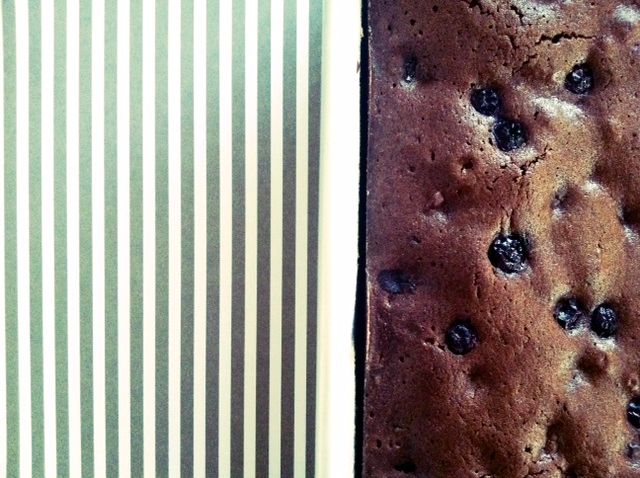
Blueberry Mocha Brownies
Blueberry Mocha...what?!
I know, it sounds odd. The first time I heard of this flavor combination, I definitely was perplexed. About a month ago I was walking down Haight Street in San Francisco and stopped to get a pick-me-up at a tiny cafe. Blueberry Mocha was on the menu and I was sold on trying this specialty beverage. I was so surprised by how much I enjoyed it! It tasted like chocolate covered blueberries mixed with my espresso. I couldn't get enough-- it was love at first sip.
If you're a Peet's Coffee fan, you may know that they have a seasonal Blueberry Mocha beverage available right now. Naturally, I became giddy when I learned of this and have ordered it the last few times I visited my local Peet's. The drink was my inspiration behind this brownie recipe and I am pretty delighted by the results.
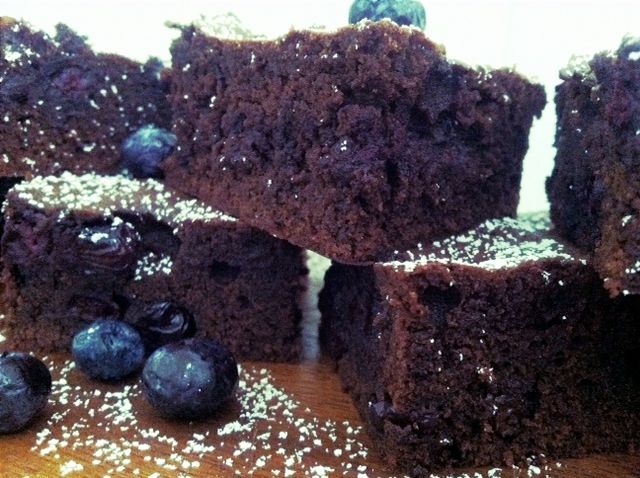
By default, rich chocolatey goodness = amazing. Throw a little espresso in to enhance the flavor and make it more interesting with a fresh and fruity blueberries-- yum! When the blueberries bake in the batter, their sweet juice seeps into the brownies making them a tantalizing treat.
Also, these bars are the perfect amount of sweetness and have a great chewy and fudgey texture. A good brownie is all about the texture! Enjoy.
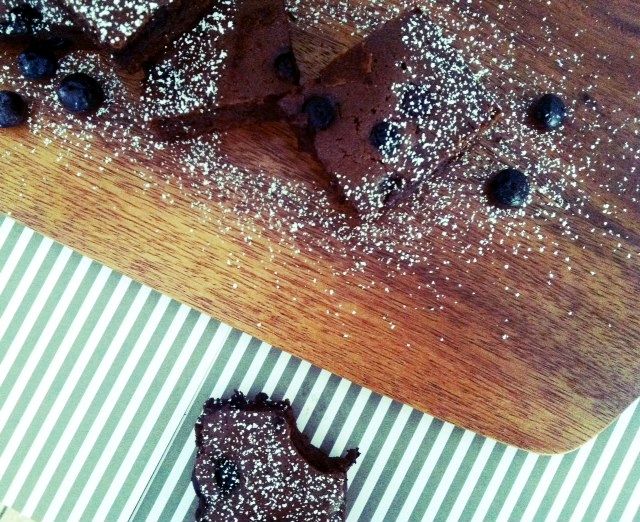
Blueberry Mocha Brownies
makes one 8x8" sheet of brownies
3/4 cup melted unsalted butter
1 cup brown sugar
3/4 cup white sugar
3 tbsp instant espresso powder
2 tsp vanilla extract
2 large eggs
2 egg yolks
3/4 cup unsweetened cocoa powder
2/3 cup all purpose flour
1/2 tsp baking powder
1/2 tsp salt
1/2 cup chopped dark chocolate
2/3 cup fresh blueberries (plus a few extra for topping)
1. In a medium bowl, use a hand mixer to cream together the melted butter, brown sugar, white sugar, espresso, and vanilla extract. Once the mixture is well combined (about 2 minutes), add the eggs and continue to mix on medium for another 3-4 minutes.
2. Sift together the cocoa powder, flour, baking powder, and salt. Slowly add these dry ingredients into the wet batter and mix on medium speed-- just until the batter doesn't have anymore dry patches. Fold in the chopped chocolate and fresh blueberries.
3. Pour and spread the batter evenly onto an 8" x 8" baking ban that has been greased and lightly floured. Sprinkle a few more blueberries on top of the batter. Bake at 350 degrees F. (on the middle rack) for 18-20 minutes. Do not over bake--the brownies will continue to cook after being transferred from the oven and you don't want to dry them out.
4. All the brownies to cool before cutting into squares and stuffing into your belly. :)
I know, it sounds odd. The first time I heard of this flavor combination, I definitely was perplexed. About a month ago I was walking down Haight Street in San Francisco and stopped to get a pick-me-up at a tiny cafe. Blueberry Mocha was on the menu and I was sold on trying this specialty beverage. I was so surprised by how much I enjoyed it! It tasted like chocolate covered blueberries mixed with my espresso. I couldn't get enough-- it was love at first sip.
If you're a Peet's Coffee fan, you may know that they have a seasonal Blueberry Mocha beverage available right now. Naturally, I became giddy when I learned of this and have ordered it the last few times I visited my local Peet's. The drink was my inspiration behind this brownie recipe and I am pretty delighted by the results.
By default, rich chocolatey goodness = amazing. Throw a little espresso in to enhance the flavor and make it more interesting with a fresh and fruity blueberries-- yum! When the blueberries bake in the batter, their sweet juice seeps into the brownies making them a tantalizing treat.
Also, these bars are the perfect amount of sweetness and have a great chewy and fudgey texture. A good brownie is all about the texture! Enjoy.
Blueberry Mocha Brownies
makes one 8x8" sheet of brownies
3/4 cup melted unsalted butter
1 cup brown sugar
3/4 cup white sugar
3 tbsp instant espresso powder
2 tsp vanilla extract
2 large eggs
2 egg yolks
3/4 cup unsweetened cocoa powder
2/3 cup all purpose flour
1/2 tsp baking powder
1/2 tsp salt
1/2 cup chopped dark chocolate
2/3 cup fresh blueberries (plus a few extra for topping)
1. In a medium bowl, use a hand mixer to cream together the melted butter, brown sugar, white sugar, espresso, and vanilla extract. Once the mixture is well combined (about 2 minutes), add the eggs and continue to mix on medium for another 3-4 minutes.
2. Sift together the cocoa powder, flour, baking powder, and salt. Slowly add these dry ingredients into the wet batter and mix on medium speed-- just until the batter doesn't have anymore dry patches. Fold in the chopped chocolate and fresh blueberries.
3. Pour and spread the batter evenly onto an 8" x 8" baking ban that has been greased and lightly floured. Sprinkle a few more blueberries on top of the batter. Bake at 350 degrees F. (on the middle rack) for 18-20 minutes. Do not over bake--the brownies will continue to cook after being transferred from the oven and you don't want to dry them out.
4. All the brownies to cool before cutting into squares and stuffing into your belly. :)
Wednesday, March 13, 2013
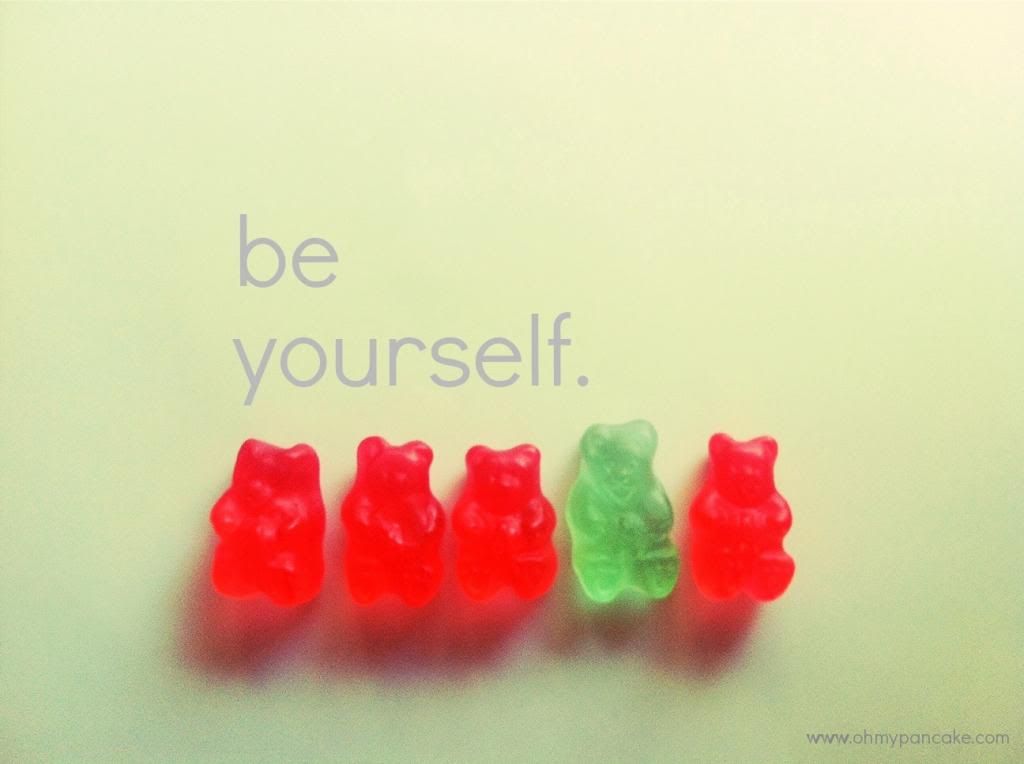
Be Yourself and Love It
The message of this post is simple, be yourself. I'm sure many of you know this, but I find it to be such a powerful reminder. Especially when there are so many odd things about myself that may be embarrassing to own up to. However, these are the things that make me unique...even if they are flaws that I am working on.
“Imperfection is beauty, madness is genius and it's better to be absolutely ridiculous than absolutely boring.” - Marilyn Monroe
20 Random Facts About Me That I Like (As dorky and flawed as they are!)
1. Songs get stuck in my head in a matter of seconds. If I hear it, I'll be singing it (off key) all day. It makes me wonder how my future child will be when he/she hears a tune.
2. Sometimes I tell random stories that don't have a point or any plot whatsoever.I laugh when my audience gets confused and I realize I have done it again.
3. When I am feeling chipper, it's pretty normal for me to bounce into a room and make some odd noise.
4. If my kitchen isn't clean in the morning (usually after I breakfast) my day will feel off. So, I make it a point to start off my day productive with picking up the kitchen as the first thing on my agenda.
5. I love when my nails are done, but I am horrible at doing them myself. They always look like a hot mess! As a result, it takes me about an hour to give myself a manicure. I like to show my best friend how bad my nails look when I see her...she cringes. :)
6. I get very emotionally involved in T.V. shows I watch regularly. For example, I get SO frustrated with Andrea on The Walking Dead. Sometimes I go to bed irritated and keep my husband up as I vent about the events as if I was there. It's like I have a more exciting social life...HA.
7. If I am passenger on a drive, I will often read all the billboards I see along the road aloud. I won't realize I am doing it until I get really tired of talking and hearing pointless information come out of my mouth.
8. I admit to being easily amused. This leads to hysterical laughter at times.
9. Some people eat when they are upset. I tend to go on a neurotic cleaning streak or a long run when I am trying to release some steam. One time when Henry and I had an argument in college, my bathroom was spotless and my closet was reorganized. That's efficiency.
10. I didn't wear my retainer properly after having braces. Now, the alignment of my teeth is off and I can slide a piece of paper in between them easily. One time I showed my students this and tried to tell them it was a magic trick. I wasn't successful at winning them over.
11. I still think that feeding my dogs peanut butter is one of the most hilarious things (see fact #8).
12. My volume control isn't very good. I have a tendency to speak really loud when it's not necessary. I am definitely not a quiet little Asian! If Ross, from Friends, was my buddy, he would probably use his quiet signal with me.
13. Goals are important to me, and I try to set them often. I think it's important to focus on something to stay motivated in any area of life. My goal for this list was to have 25 facts.
14. I can worry a lot, but I try not to sweat the small stuff. Sometimes things in life don't work out and I try to see the positive side (it's not always easy, but I try). For example, I got too tired to think of 25 facts, so I cut the list down to 20. No big deal. See what I mean? Staying positive.
15. When brushing my teeth, I squeeze the middle of the tube rather than pushing the paste upward.
16. Since I grew up with two older brothers, I have hidden tomboy traits in me. For example, my favorite WWF wrestler was a dude named Razor Ramon. I must have liked his color spandex.
17. When I taught, I loved having the kids participate in my wackiness. For instance, before a winter break, I bought them all fake mustaches to wear in class all day.
18. I love dogs so much. Our neighbor has a sweet dog and I have thought about ways to bump into the family with their dog so I can play with it. Yes, that's weird. But, asking, "Can your dog come out to play?" is weirder.
19. I have a fear of lice as a result of teaching children for 6 years. I worry about sitting in movie theater seats and always ask Henry if he thinks I'll get lice. I like to think I am health conscious.
20. I make up phrases that don't make sense and mix up idioms. For example, I tend to say, "Up the Kazoo" instead of, "Up the Wazoo". In my defense, I'd rather have a kazoo than deal with going up any wazoo. Right?
Here's a question for YOU, you fabulous reader, you. Leave a comment and share one random fact about you that makes you unique. :)
Tuesday, March 12, 2013
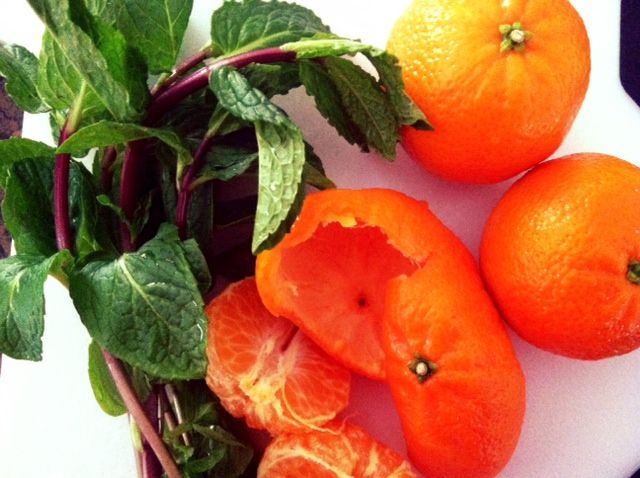
Tangerine-Mint Collins
With spring just around the corner, the thought of warm evenings and dinners outside give me the warm fuzzies. What's a great accompaniment to a spring meal? A delicious and refreshing gin cocktail-- a Tangerine-Mint Collins, perhaps? This just may give you the warm fuzzies, too. If you have enough of it, I just may mean that literally.
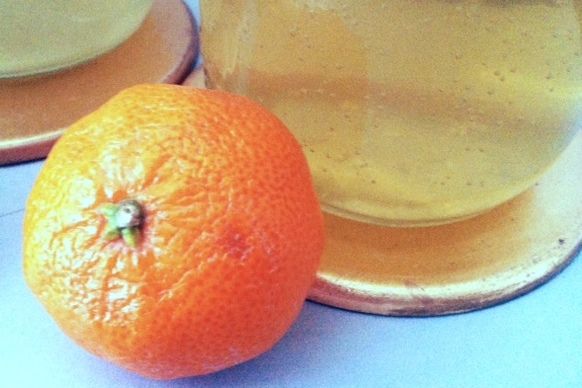
I don't tend to drink a lot, but Gin is my absolute favorite type of hard liquor. I find the taste to be quite crisp and refreshing when paired with the right additions in a cocktail, or even just with some tonic water and a bit of citrus.
A traditional Tom Collins consists of very simple and few ingredients-- gin, lemon, sugar, and soda water. This recipe I created adds a delicious twist that keeps the cocktail light and easy to drink, but with a bit more depth of flavor. Although gin can be quite the star, I think the real show stopper in this refreshment is the tangerine-mint simple syrup. If you don't prefer alcoholic beverages (or just want a change), you can use this simple syrup in teas or lemonades as it really adds great flavor. Enjoy!
Tangerine-Mint Simple Syrup
makes one pint
1 cup water
1 cup white granulated sugar
handful of fresh mint leaves (stems on)
skins of 3 tangerines
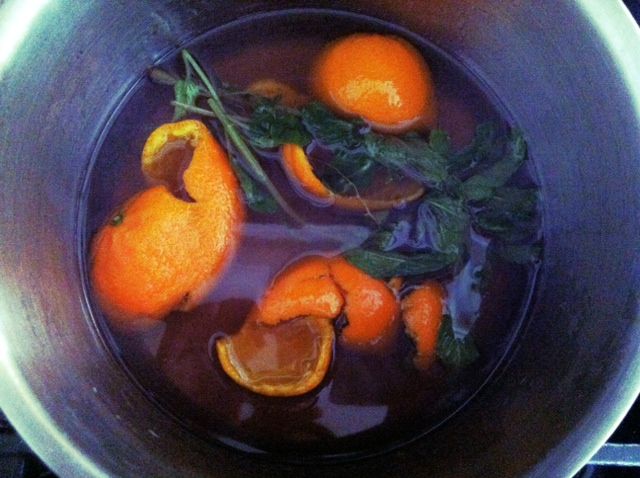
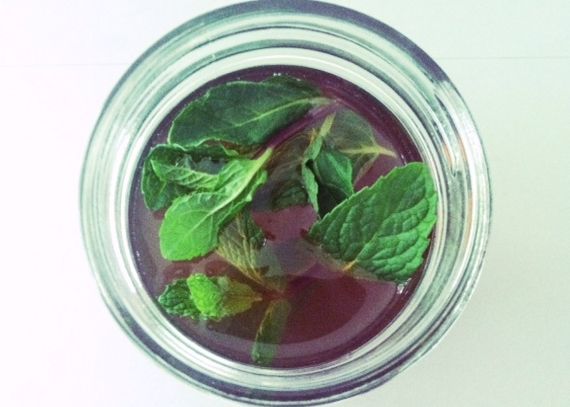
1. In a small sauce pot, stir together the water and sugar. Heat on medium and stir continuously. As soon as the syrup comes to a bubbling boil, turn off the heat. Add the mint leaves and tangerine skins. Stir and let the syrup cool down for about an hour before. Use a strainer and pour the syrup into a pint size jar (make sure it has cooled down completely before sealing). Use as desired.
Tangerine-Mint Collins
makes 2 drinks
1/2 cup good gin (my favorite is Bombay)
1/4 cup tangerine-mint simple syrup
1/4 cup sparkling apple cider
1/2 cup club soda
4-6 mint leaves
1. In a cocktail shaker, combine the gin, simple syrup, and a few of the mint leaves. Shake well and pour halfway into glasses filled with ice. Add about 1/4 cup of club soda to each glass and garnish with the remaining mint leaves.
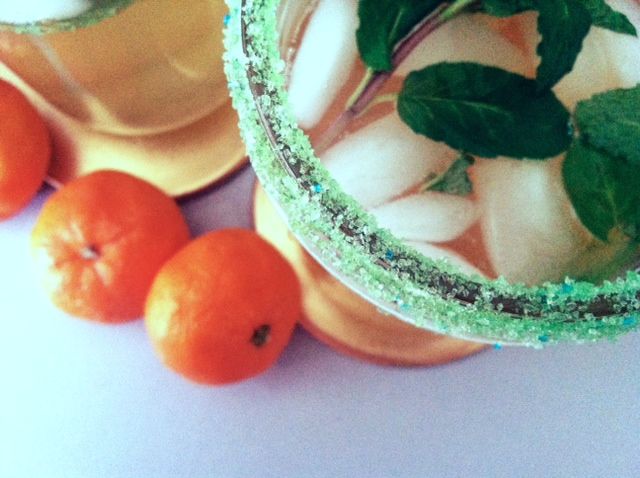 | ||||
| served in Mason jars with a rims of green sugar for some sweet whimsy |
I don't tend to drink a lot, but Gin is my absolute favorite type of hard liquor. I find the taste to be quite crisp and refreshing when paired with the right additions in a cocktail, or even just with some tonic water and a bit of citrus.
A traditional Tom Collins consists of very simple and few ingredients-- gin, lemon, sugar, and soda water. This recipe I created adds a delicious twist that keeps the cocktail light and easy to drink, but with a bit more depth of flavor. Although gin can be quite the star, I think the real show stopper in this refreshment is the tangerine-mint simple syrup. If you don't prefer alcoholic beverages (or just want a change), you can use this simple syrup in teas or lemonades as it really adds great flavor. Enjoy!
Tangerine-Mint Simple Syrup
makes one pint
1 cup water
1 cup white granulated sugar
handful of fresh mint leaves (stems on)
skins of 3 tangerines
1. In a small sauce pot, stir together the water and sugar. Heat on medium and stir continuously. As soon as the syrup comes to a bubbling boil, turn off the heat. Add the mint leaves and tangerine skins. Stir and let the syrup cool down for about an hour before. Use a strainer and pour the syrup into a pint size jar (make sure it has cooled down completely before sealing). Use as desired.
Tangerine-Mint Collins
makes 2 drinks
1/2 cup good gin (my favorite is Bombay)
1/4 cup tangerine-mint simple syrup
1/4 cup sparkling apple cider
1/2 cup club soda
4-6 mint leaves
1. In a cocktail shaker, combine the gin, simple syrup, and a few of the mint leaves. Shake well and pour halfway into glasses filled with ice. Add about 1/4 cup of club soda to each glass and garnish with the remaining mint leaves.
Subscribe to:
Posts (Atom)